Important: In order to avoid immediate staining, make sure any Marcite Finished pools cure at least 90 days before your Power Ionizer System is used.
Electrical Hook-Up
CAUTION:
- Do not connect power to your Power Ionizer until you have followed the System Installation Instructions.
- Alteration of any electrical cord will render the warranty null and void.
- Ensure that your electrical hook-up conforms with all local national electrical codes.
Your 120 volt Power Ionizer System can be plugged directly into a properly grounded, GFCI protected receptacle with the provided cord .
***PLEASE REFERENCE SAFETY INSTRUCTIONS BEFORE PROCEEDING!***
If a GFCI protected outlet has been installed, you are now prepared to install your Power Ion System.
WARNING: IF YOUR SYSTEM INCLUDES A GAS HEATER, BE SURE TO INSTALL YOUR POWER ION SYSTEM AT LEAST 18″ FROM THE HEATER UNIT.
SYSTEM INSTALLATION
- Turn your pool filtration system off. Plug both the water suction and return fittings on your pool to prevent any water loss during system installation.
IN-GROUND POOL INSTALLATION: Remove a horizontal section of the water return line after the Pool Filter, using PVC Glue and Primer install your unit.
NOTE: Be sure to allow for EASY REPLACEMENT of your Ionizer Chamber. Quick Disconnects should be used on both ends of the chamber.
- Disconnect the water return hose from your filter unit and remove the connecting threaded fitting from your filter. Apply Teflon tape to the fitting and re-install it into the female pipe thread end of your chamber.
- Apply Teflon tape to both ends of the connector fitting included with your system. Carefully thread it into your filter return port (DO NOT OVER TIGHTEN). Apply the union nut to the tailpiece provided and thread the tailpiece onto the remaining thread of the connector.
- Be sure the gasket is in position, connect your chamber and re-install your filter hose to the original fitting.
- Open both your suction and return lines to your filter system and inspect for any water leaks. Turn your filter system on and connect power to you Power Ionizer System.
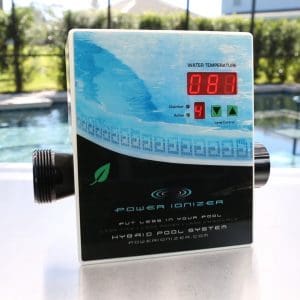
System Features
There are two(2) indicator lights located on the side panel of the Power Ionizer
“Active” – “System Activated on older models” – indicates the Power Ionizer is attached to a live power source, and the electrodes are receiving power.
“Chamber” – “Service on older models” – indicates the electrodes are not producing ions and that it is time to replace your Power Ionizer Chamber.
Your “Level Control Knob” will adjust the rate at which copper and silver ions are dispensed into the pool water.
Temperature Display
The Temperature Display is provided to allow you to know the temperature of the water in your swimming pool with a glance from a distance. This will be accurate (within 4 degrees) provided your filtration system is operating at the time.
After installation, if your Power Ionizer faces the wrong direction to see the display, it can be reversed by simply removing the four (4) mounting screws that secure the Transformer Module to the Electrode Chamber and turning it around. If you do this, be careful not to damage the temperature sensor cable when you re-attach the Chamber to the Module.